CONTROLLING SERVO FROM ANDROID
(MIT APP INVENTOR & ARDUINO)


Schematic Diagram


3. Arduino File .INO
(MIT APP INVENTOR & ARDUINO)
Related to my previous MIT App Inventor tutorial video, someone ask me to making video tutorial video to controlling multiple servo from android. But i don't have enough time to make preparation for "vlogging". So, today i just make post on my blog with some screenshot!

Open your browser, and log in your MIT App Inventor account and create new project.
Drag in Label for displaying accelerometer X, Y value. Don't forget to drag in Bluetooth Client, Clock and Accelerometer Sensor. Rename all variable.

Drag all block needed. Here is screenshot may help you!

And here is Arduino Code. You can copy and paste this code on your Arduino IDE or can directly download from link provided below.
/////////////////////////////////////////////////COPY AND PASTE THIS CODE///////////////////////////////////////////////
#include <Servo.h>
Servo x_servo;
Servo y_servo;
String x_angle; String y_angle;
int x_value; int y_value;
void setup() {
Serial.begin(9600);
Serial.setTimeout(30);
x_servo.attach(4);
y_servo.attach(5);
x_servo.write(45); y_servo.write(45); //default position
}
void loop() {
if (Serial.available() > 0){
x_angle = Serial.readStringUntil('x');
y_angle = Serial.readStringUntil('y');
x_value = x_angle.toInt();
y_value = y_angle.toInt();
x_servo.write(x_value);
y_servo.write(y_value);
//uncomment to reverse servo movement
//x_servo.write(((x_value)*-1)+180);
//y_servo.write(((y_value)*-1)+180);
}
}
///////////////////////////////////////////////////////////////END OF CODE////////////////////////////////////////////////////////////

Hardware Setup
Wiring as follow:
I highly recommend to use external power source for servo & bluetooth. They draw lot of current,your project may not running as you expected.
Servo 1 Pulse - Pin 4 Arduino
Servo 2 Pulse - Pin 5 Arduino
Servo 2 Pulse - Pin 5 Arduino
Bluetooth TX - RX Arduino
Bluetooth RX - TX Arduino
Bluetooth RX - TX Arduino
Bluetooth VCC - 5V Arduino
Bluetooth GND - Arduino GND
Breadboard Layout
Breadboard Layout

Schematic Diagram
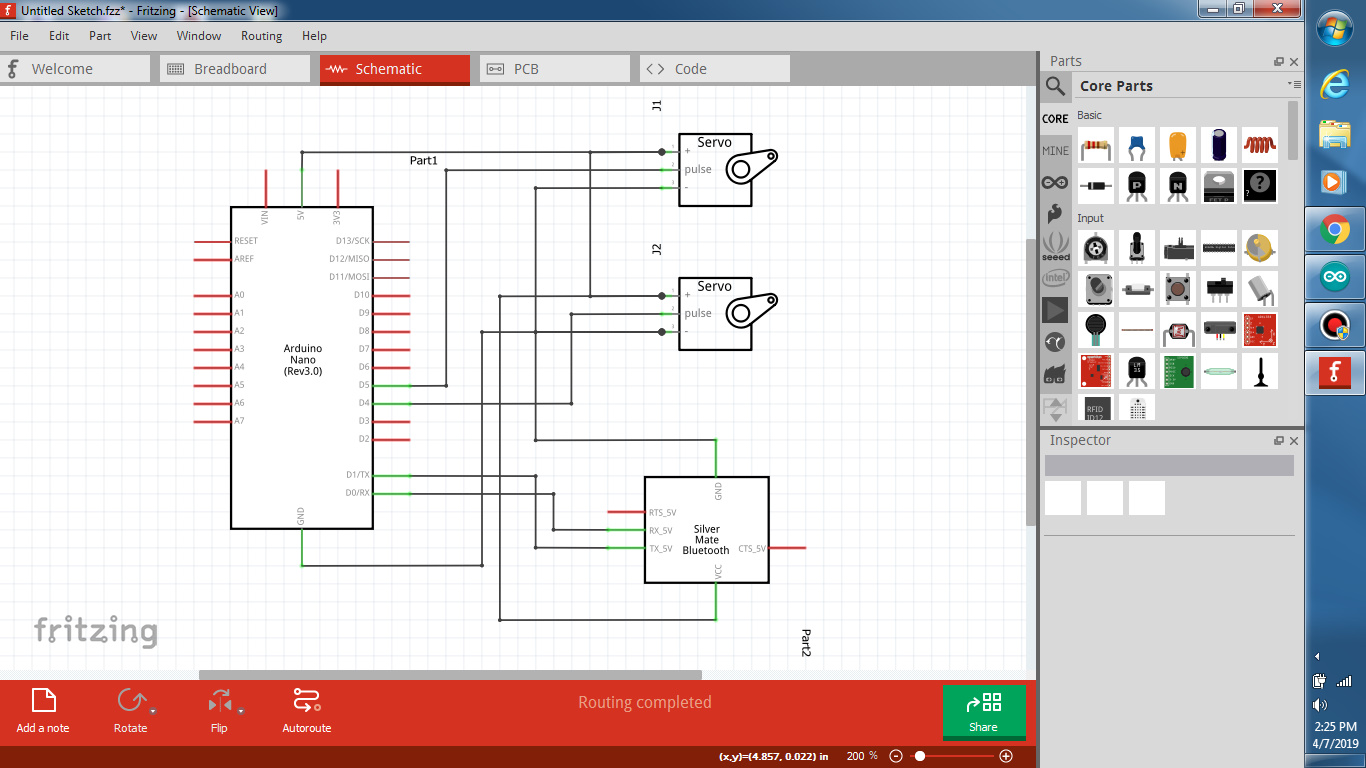
This is how i setup. im using Arduino Nano Expension Shield.


Then try to connect your bluetooth from your android to bluetooth module.
DOWNLOAD LINK
1. Android File .AIA
2. Android File .APK
https://drive.google.com/open?id=1DrQ-4HnBgtHJBZPqI93NBf6CvM_NE1nZ
https://drive.google.com/open?id=1DrQ-4HnBgtHJBZPqI93NBf6CvM_NE1nZ
3. Arduino File .INO
This comment has been removed by the author.
ReplyDeleteHi sir, nice tutorial. But I have one question, I tried to get X Y Z from the phone and send the data to arduino. I then use the serial monitor to check the reading of X Y Z, from there the data X Y is correct, but Z is always wrong. Can I know why? I can't post the photo here, but you can check from my google drive here...https://drive.google.com/drive/folders/1LRCqsggITi-o9UiLr8M4aROWBNUno6Kd
ReplyDeleteCan you post your arduino code? let me check how you buffer your data.
DeleteAlso dont forget to set your baud rate on serial monitor, and "no line ending"
#include
Servo x_servo;
Servo y_servo;
Servo z_servo;
String x_angle; String y_angle;
int x_value; int y_value; int z_value;
void setup() {
Serial.begin(9600);
Serial.setTimeout(30);
x_servo.attach(4);
y_servo.attach(5);
z_servo.attach(6);
x_servo.write(45); y_servo.write(45); z_servo.write(45);//default position
}
void loop() {
if (Serial.available() > 0){
x_angle = Serial.readStringUntil('x');
y_angle = Serial.readStringUntil('y');
z_angle = Serial.readStringUntil('z');
x_value = x_angle.toInt();
y_value = y_angle.toInt();
z_value = z_angle.toInt();
x_servo.write(x_value);
y_servo.write(y_value);
z_servo.write(z_value);
//uncomment to reverse servo movement
//x_servo.write(((x_value)*-1)+180);
//y_servo.write(((y_value)*-1)+180);
}
}
Because right now I just want to make sure that all those values can be received by my Arduino, so I had edited your code. Ya my baud rate is 9600 and no line ending.
ReplyDelete#include
Servo x_servo;
Servo y_servo;
int x_angle;
int x_value;
void setup() {
Serial.begin(9600);
Serial.setTimeout(30);
x_servo.attach(4);
y_servo.attach(5);
}
void loop() {
if (Serial.available() > 2){
x_angle = Serial.read();
// y_angle = Serial.readStringUntil('y');
//x_value = x_angle.toInt();
// y_value = y_angle.toInt();
Serial.println(x_angle);
//x_servo.write(x_value);
//y_servo.write(y_value);
//uncomment to reverse servo movement
//x_servo.write(((x_value)*-1)+180);
//y_servo.write(((y_value)*-1)+180);
}
}
Theres many way to buffer data in string. Usually programmer use "terminator" to separate the data that they have send. In my case, im using character 'x' 'y' and 'z'
ReplyDeleteThough this is easiest way to receive and separate data that you have send from android with just few line of code
This comment has been removed by the author.
ReplyDeleteThanks for sharing interesting information about best drones with camera. To know more information about best drones with camera, feel free to visit for the best drones with camera for a beginner.
ReplyDeleteBest drones with camera under $100
Best drones with camera under $200
Best drones with camera under $300
Best drones with camera under $500
I can't download aia files. Can send it to me? ano12turma1@gmail.com
ReplyDeleteThanks for sharing this valuable article over here. You have shared such informative news about Arduino. Thanks Author.
ReplyDeleteWhat is Arduino