Arduino + 7 Segment
Sebarang pertanyaan/pembelian/bantuan boleh dm saya dia twitter eh:
In this post i use :
-Arduino Mega 2560
-5101AS 7 segment
-Breadboard
-Jumper cables.
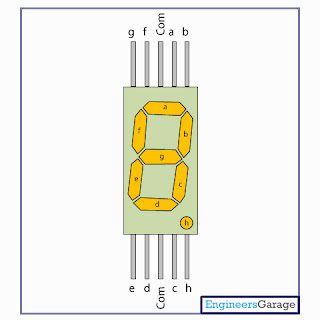
5101AS 7 segment
Okay before we start wire up the 7 segment, we should know which one pin is "common" pin.
Common(com) is at the middle. Labelled as "com".
okay now lets go the next step..
wire up your component like this.
remember! dot always at the downside
After finished, open your Arduino IDE and copy and paste this code or just download it here
void setup() {
pinMode(2, OUTPUT); //set all pin that i've use as output pin
pinMode(3, OUTPUT);
pinMode(4, OUTPUT);
pinMode(5, OUTPUT);
pinMode(6, OUTPUT);
pinMode(7, OUTPUT);
pinMode(8, OUTPUT);
pinMode(9, OUTPUT);
}
void loop() {
one(); //tunjuk nombor 1
delay(1000); //display number 1 for 1000miliseconds(1second)
two();
delay(1000);
three();
delay(1000);
four(); //display number 4
delay(1000); //display number 4 for 1second
five();
delay(1000);
six();
delay(1000);
seven();
delay(1000);
eight(); //keluar nombor 8
delay(1000); //akan keluar nombor 8 selama 1 saat
nine();
delay(1000);
}
/* modify code here to display another number or characters*/
void one(void) //<------------void to display number 1
{
digitalWrite(2, LOW); //centre
digitalWrite(3, HIGH); //top left
digitalWrite(4, LOW); //top
digitalWrite(5, LOW); //top right
digitalWrite(6, HIGH); //bottom left
digitalWrite(7, LOW); //bottom
digitalWrite(8, LOW); //bottom right
digitalWrite(9, HIGH); //dot
}
void two(void) //<---------------- void to display number 2
{
digitalWrite(2, HIGH); //centre
digitalWrite(3, LOW); //top left
digitalWrite(4, HIGH); //top
digitalWrite(5, HIGH); //top right
digitalWrite(6, HIGH); //bottom left
digitalWrite(7, HIGH); //bottom
digitalWrite(8, LOW); //bottom right
digitalWrite(9, HIGH); //dot
}
void three(void) //<------- call this void to dsplay number 3
{
digitalWrite(2, HIGH); //centre
digitalWrite(3, LOW); //top left
digitalWrite(4, HIGH); //top
digitalWrite(5, HIGH); //top right
digitalWrite(6, LOW); //bottom left
digitalWrite(7, HIGH); //bottom
digitalWrite(8, HIGH); //bottom right
digitalWrite(9, HIGH); //dot
}
void four(void) //<----diguna kan untuk keluar kan nombor 4.
{
digitalWrite(2, HIGH); //centre
digitalWrite(3, HIGH); //top left
digitalWrite(4, LOW); //top
digitalWrite(5, HIGH); //top right
digitalWrite(6, LOW); //bottom left
digitalWrite(7, LOW); //bottom
digitalWrite(8, HIGH); //bottom right
digitalWrite(9, HIGH); //dot
}
void five(void)
{
digitalWrite(2, HIGH); //centre
digitalWrite(3, HIGH); //top left
digitalWrite(4, HIGH); //top
digitalWrite(5, LOW); //top right
digitalWrite(6, LOW); //bottom left
digitalWrite(7, HIGH); //bottom
digitalWrite(8, HIGH); //bottom right
digitalWrite(9, HIGH); //dot
}
void six(void)
{
digitalWrite(2, HIGH); //centre
digitalWrite(3, HIGH); //top left
digitalWrite(4, HIGH); //top
digitalWrite(5, LOW); //top right
digitalWrite(6, HIGH); //bottom left
digitalWrite(7, HIGH); //bottom
digitalWrite(8, HIGH); //bottom right
digitalWrite(9, HIGH); //dot
}
void seven(void)
{
digitalWrite(2, LOW); //centre
digitalWrite(3, LOW); //top left
digitalWrite(4, HIGH); //top
digitalWrite(5, HIGH); //top right
digitalWrite(6, LOW); //bottom left
digitalWrite(7, LOW); //bottom
digitalWrite(8, HIGH); //bottom right
digitalWrite(9, HIGH); //dot
}
void eight(void)
{
digitalWrite(2, HIGH); //centre
digitalWrite(3, HIGH); //top left
digitalWrite(4, HIGH); //top
digitalWrite(5, HIGH); //top right
digitalWrite(6, HIGH); //bottom left
digitalWrite(7, HIGH); //bottom
digitalWrite(8, HIGH); //bottom right
digitalWrite(9, HIGH); //dot
}
void nine(void)
{
digitalWrite(2, HIGH); //centre
digitalWrite(3, HIGH); //top left
digitalWrite(4, HIGH); //top
digitalWrite(5, HIGH); //top right
digitalWrite(6, LOW); //bottom left
digitalWrite(7, HIGH); //bottom
digitalWrite(8, HIGH); //bottom right
digitalWrite(9, HIGH); //dot
}
Code explaination
pinMode(2, OUTPUT);
- to set all pin that i've use as output pin
one();
-called void "one" to display number 1 on 7 segment.
five();
-called void "five" to display number 5 on 7 segment.
delay(1000);
-to display the number on 7 segment for 1 second
void one(void)
{
digitalWrite(2, LOW); //centre
digitalWrite(3, HIGH); //top left
digitalWrite(4, LOW); //top
digitalWrite(5, LOW); //top right
digitalWrite(6, HIGH); //bottom left
digitalWrite(7, LOW); //bottom
digitalWrite(8, LOW); //bottom right
digitalWrite(9, HIGH); //dot
}
-this is void wheres i use it to create the number
for example;
digitalWrite(8, HIGH); //bottom right
-on 7 segment will show this
Download Link
Arduino Code:
https://drive.google.com/open?id=0B3c_VPBO9Qq3aUNnMXVIbEc3N3M


Simple Arduino Program: Arduino + 7 Segment >>>>> Download Now
ReplyDelete>>>>> Download Full
Simple Arduino Program: Arduino + 7 Segment >>>>> Download LINK
>>>>> Download Now
Simple Arduino Program: Arduino + 7 Segment >>>>> Download Full
>>>>> Download LINK Th